Standard Tools
3D TAKEOFF
So, what sets Haqq Takeoff apart from others? Haqq Takeoff's takeoff tools cover elements completely, just like painting manually, ensuring you don't miss anything. As you can see in the picture below, Haqq Takeoff’s takeoff tools are designed to cover all elements fully. The biggest advantage of Haqq Takeoff for an estimator is the 3D feature. Now, by simply clicking the 3D button, you can visualize what you have taken off with the same colors and elevations given by your inputs. The 3D and 2D views sync with each other: any changes made in 3D will be reflected in 2D, and any changes made in 2D will be reflected in 3D. Additionally, you can add or edit takeoff elements directly from the 3D screen.
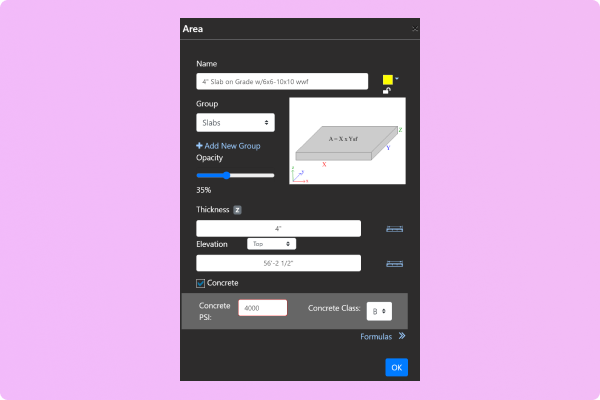
Group: Groups are designed to keep similar elements under one total. This way, we get a total for groups in the takeoff tab. For example, grouping all the column footings gives us a total for all, and instead of pricing each column footing separately, you can have a total number for your pricing.
Demonstration Picture: Your screen has a 2D plan view, using two axes: X (horizontal left-right directions) and Y (vertical up-down directions). The Z-axis represents the dimension coming towards you and away from you. On the area form, Z will represent the thickness of the element.
Elevation: In a 2D environment, you won't see the effect of entering a value for elevation, but this is crucial if you want to see the 3D result of your element. The elevation point of each element is the central gravity point of the top or bottom surface.
Concrete: If your element is concrete, you can check this box and enter the concrete PSI value and class. Default values are set to 4,000 PSI and Class B for your element. This will allow Haqq Takeoff to calculate the lap splice for the reinforcing steel.
Dimension Entry: You can enter the value in inches without any symbols. Haqq Takeoff will consider it as inches and convert it to feet and inches. Also, you can type as shown in the construction documents, like 2’-3” or with fractions, like 2’-3 1/4”.
It may seem like a lot to do, but believe me, it’s not. All you have to do is:
- Give a name
- Select color and group
- Enter thickness
- Enter elevation
** Once you change the concrete PSI value and group, they stay updated, so you don’t have to change them every time.
COUNT TAKEOFF TOOL
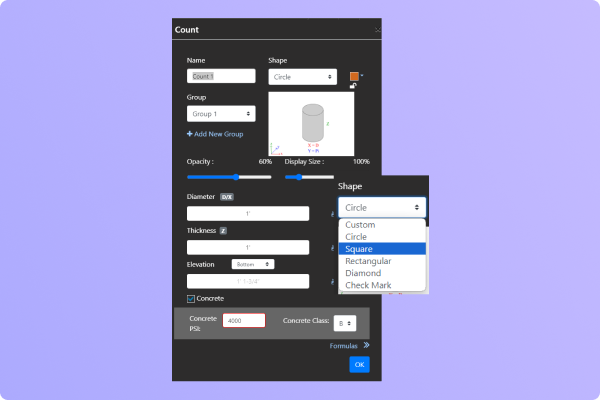
Just like the area tool, the count tool has similar form fields to fill out. When selecting shapes, don't just choose any shape you like. The purpose of the count tool is to select the actual shape of the element and add the correct dimensions. These are the shapes you can find. As you can imagine, for round elements, select the circle; for square elements, select the square. For irregular shapes, you can select the custom shape and trace the shape of the element. Diamond and checkmark shapes can be used for anything . For irregular shapes, you can select the custom shape and trace the shape of the element. Diamond and checkmark shapes can be used for anything .
Start Free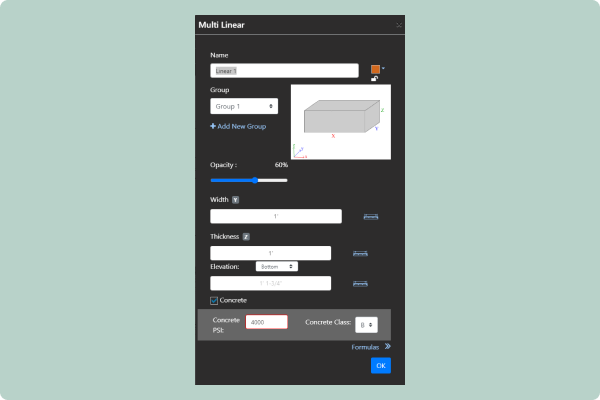
LINEAR TAKEOFF TOOL
And the last takeoff tool is the linear tool form. Like the others, you need to fill out each field. Once you set the elevation, all your entries will be at the same elevation. If you have stepped footings or elevation changes in elements, instead of having a continuous element, break the elements into parts. Stop and start again by pushing the play button from the left panel.
PROPERTY WINDOW
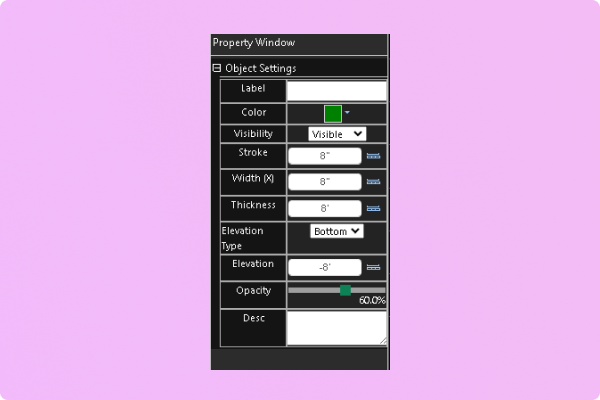
To change the elevation for an individual element, open the property window by right-clicking on that particular object of the element. The property window will open on the right side, allowing you to change values for individual objects within the same element.
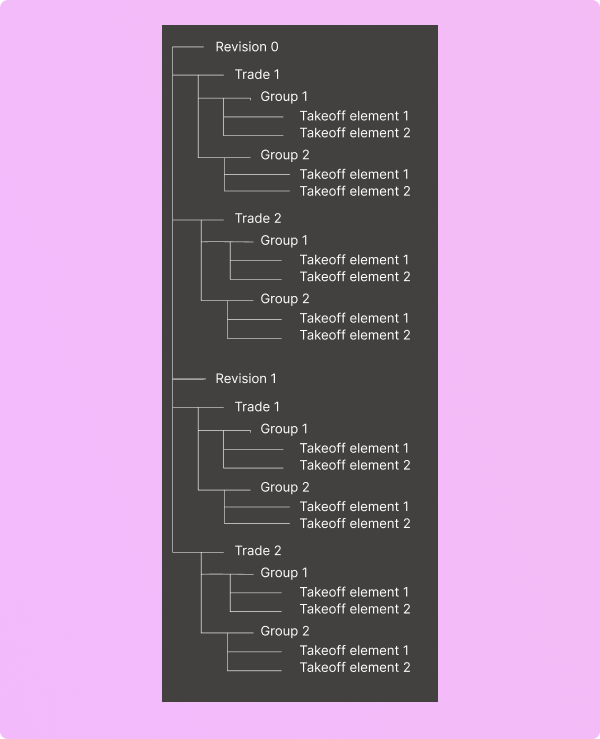
Understanding Revisions, Trades, and Groups in Haqq Takeoff
Creating a project is straightforward, but mastering revisions, trades, and groups will help you fully leverage Haqq Takeoff's potential. Revisions: Revisions track changes within a project. Every project starts with Revision 0. New revisions, like Revision 1, inherit trades and groups from Revision 0. Adding a trade or group to any revision replicates it across all revisions, enabling seamless copying of elements. Trades: Trades represent different construction parts or bids. For instance, you can assign roofing and framing to specific trades. If concrete foundation and superstructure need distinct pricing, create separate trades for each. This setup allows for separate total calculations for each trade. Groups: Groups consolidate similarly priced elements. For example, create one group for all column footings and another for columns. This way, you can aggregate and price similar elements collectively, ensuring efficient cost management.
